Introduction
Bepo, my home server and ongoing homelab project, grew out of past mistakes, lessons learned, and a lot of experimentation. It currently runs on a Lenovo ThinkServer TD340, and this post walks through the hardware choices, storage layout, software stack, and the many applications that make up the system. I also cover the challenges I have run into along the way and what each one taught me.
This writeup is aimed at anyone interested in getting into homelabbing, even if you are just starting to explore the idea. If you want to see what a real setup looks like, how the pieces connect, and what is possible once things grow beyond a few containers, this overview should help you think through your own build.
By the time you finish reading, you will have a clear picture of:
- The hardware that powers this homelab.
- How storage, virtualization, and containers work together in practice.
- The apps and services that are genuinely useful day to day.
- The network and security considerations that matter at home.
- The real challenges behind it all and how they were solved.
Hopefully, my experience helps you design a setup that fits your own needs and not make the same mistakes as me.
Inspiration
Before building Bepo, I always had a more robust VPS to run my projects and other applications. Still, I did not trust the security and privacy of my data. The saying "The cloud is just someone else's computer" always stuck with me. I wanted more control over my data and services while reducing my dependency on third-party providers.
It started with a Dell Optiplex 7010 I picked up for free and a Lenovo ThinkCentre M93P I got for 20 dollars, eventually ending up with my Lenovo ThinkServer TD340.
Hardware Specifications & Cost
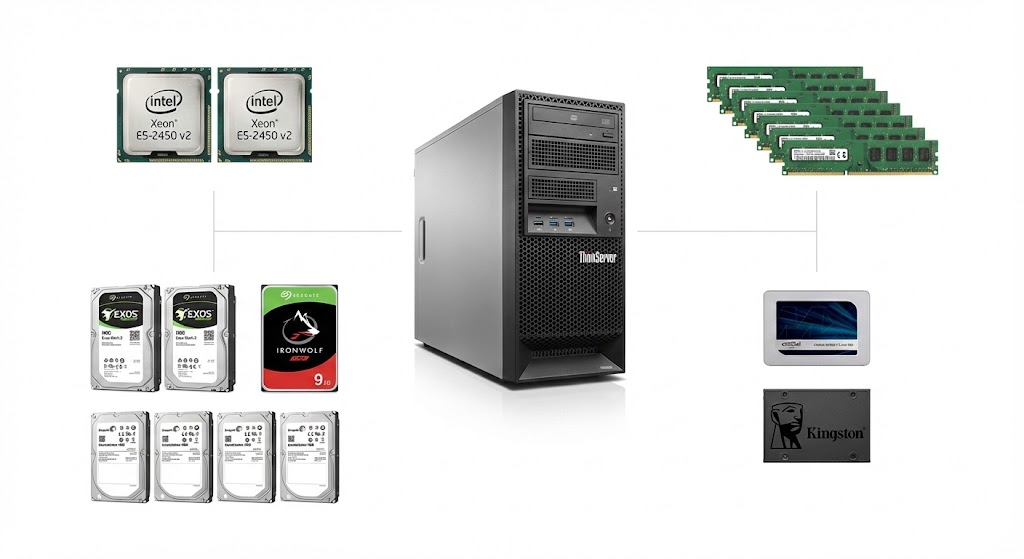
Bepo is built on a Lenovo ThinkServer TD340, an enterprise-grade server targeted at smaller businesses, released in 2013. I got it for 60 dollars from a local seller who had it sitting in brand-new condition. After some research, it turned out to be a great deal and compatible with relatively inexpensive parts.
Here are the hardware specifications of my setup and how much it cost me:
| Component | Spec | Cost | Notes |
|---|---|---|---|
| Model | Lenovo ThinkServer TD340 | 60 dollars | Came with 16 GB DDR3 1333 MHz ECC and 1x Intel Xeon E5-2420 v2 |
| CPU | 2x Intel Xeon E5-2450 v2 (16c/32t total) | 20 dollars | |
| Memory | 110 GB DDR3 1333 MHz ECC RAM | 50 dollars | Picked up 94 GB of matching sticks off a local recycler |
| Storage | 2x 14 TB Exos Mach.2, 1x 10 TB IronWolf Pro | 269.18 dollars each, 246.39 dollars | Primary pool drives |
| Storage | 4x 2 TB Seagate Constellation | Free | Legacy data drives |
| Storage | 1x Crucial MX500 1 TB SSD | 70 dollars | VM images and app configs |
| Storage | 1x Kingston KC600 256 GB SSD | Free | Scratch and misc |
The Core Infrastructure: OS, Storage, and Virtualization
My server runs a combination of bare-metal services, containerized applications, and full virtual machines, managed through specific software choices.
Operating System & Containerization
| Layer | Choice | Notes |
|---|---|---|
| Host OS | Ubuntu Server 24.04 LTS | Bare-metal base |
| Containers | Docker + Docker Compose | Primary app runtime |
I chose a bare-metal Ubuntu Server installation as a foundation. The vast majority of my applications run inside Docker containers, managed using Docker Compose. This gives me lightweight isolation, simpler deployment, a clean host OS, and straightforward dependency management. Each application or logical group of services has its own docker-compose.yml file for easy management.
Virtualization Layer: KVM & Libvirt
While Docker is my primary tool, sometimes a full virtual machine is necessary or just more appropriate.
| Layer | Choice | Notes |
|---|---|---|
| Hypervisor | KVM | Kernel-integrated virtualization with strong performance |
| Management | libvirt | Unified tooling via virsh, virt-manager, or Cockpit |
Why use VMs alongside Docker?
- Operating system diversity (Windows Server, different distros).
- Full kernel isolation for stronger security boundaries.
- Hardware passthrough (GPU, USB devices).
- Legacy apps that are not easily containerized.
VMs do consume more resources (RAM and disk space for the full OS) than containers, but they give me maximum compatibility and isolation when needed. VM disk images live on the SSD for better performance.
Storage Strategy: MergerFS and SnapRAID
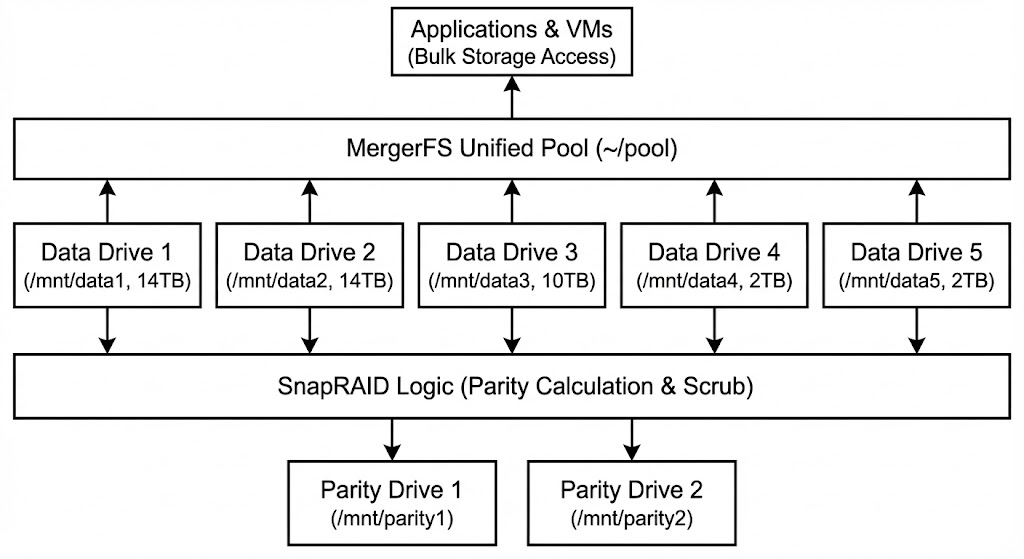
My primary storage goal was to combine my data drives (14 TB and 10 TB) into a single, large pool while maintaining redundancy against single drive failure. Hardware RAID was not ideal because of the mismatched drive sizes.
So I went with a two-layer approach.
- 01
MergerFS
Creates a unified filesystem view at ~/pool from /mnt/data1..data5. Simplifies access but does not provide redundancy.
- 02
SnapRAID
Calculates parity for /mnt/data1..data5 and stores it on /mnt/parity1..parity2. Recovers data if a drive fails.
Why SnapRAID?
When I started looking at redundancy options, RAID 5 was an early contender, but the existing mix of drive sizes (14 TB, 10 TB, and smaller drives) clashed with standard RAID levels.
My requirements were:
- Ability to use differently sized drives.
- Ability to add drives later without rebuilding the array.
- Decent read performance (writes are less critical for my media).
- Full control over the setup.
This pushed me to compare Unraid and SnapRAID.
| Option | Why I chose it | Tradeoffs |
|---|---|---|
| Unraid | Popular and easy to use | Full OS, requires a license, too heavy for a Linux-first setup |
| SnapRAID | Open source, flexible, supports mixed drive sizes | Parity is not real-time; requires scheduled sync/scrub |
File Layout & Data Management
My file structure is designed around clarity and separation of concerns:
| Path | Purpose | Notes |
|---|---|---|
| ~/apps | Docker Compose + app config | Bind-mounted volumes on SSD |
| ~/vms | VM disk images (qcow2) | SSD for performance |
| ~/pool | MergerFS pooled data | media/, share/, downloads/, backups/ |
Networking, Security, and Applications
With the core infrastructure defined, here is how networking, security, and actual applications are put together.
Networking Approach
- Exposure:
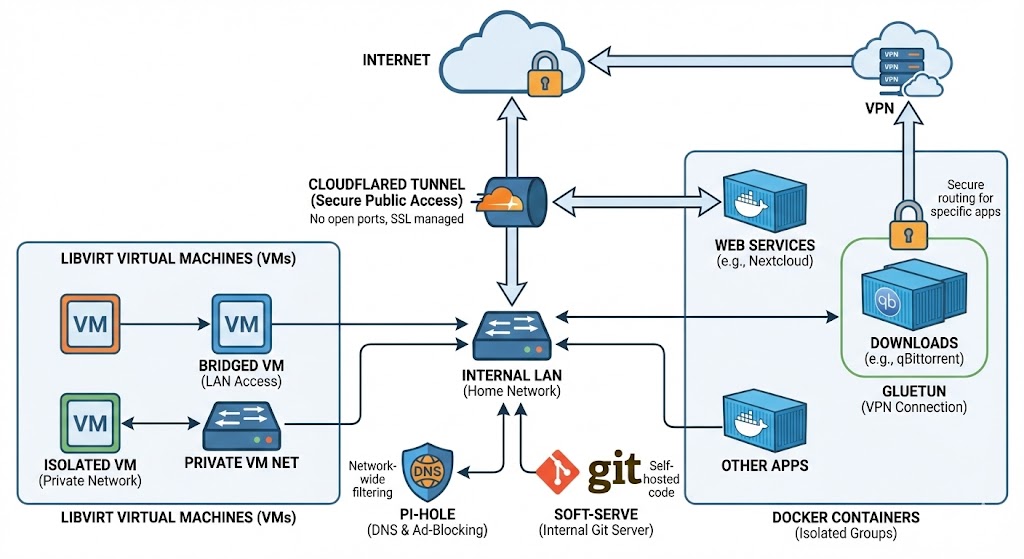
Cloudflaredtunnels provide secure, easy-to-manage public access to specific web services without opening firewall ports or wrestling with SSL certificates directly. - VPN:
Gluetunmanages VPN connections for specific containers (mainlyqBittorrent), so their traffic is routed securely. - DNS and Ad Blocking:
Pi-holeacts as my local DNS resolver and blocks ads and trackers across the network. - Internal Git:
Soft-Serveprovides a self-hosted Git server. - Container and VM Networking: Docker networks isolate application groups, while libvirt manages virtual networks for VMs. These can be bridged to the LAN or kept isolated. Only the services that genuinely need it are exposed externally.
Security Measures
Security is a priority, especially once anything touches the public internet.
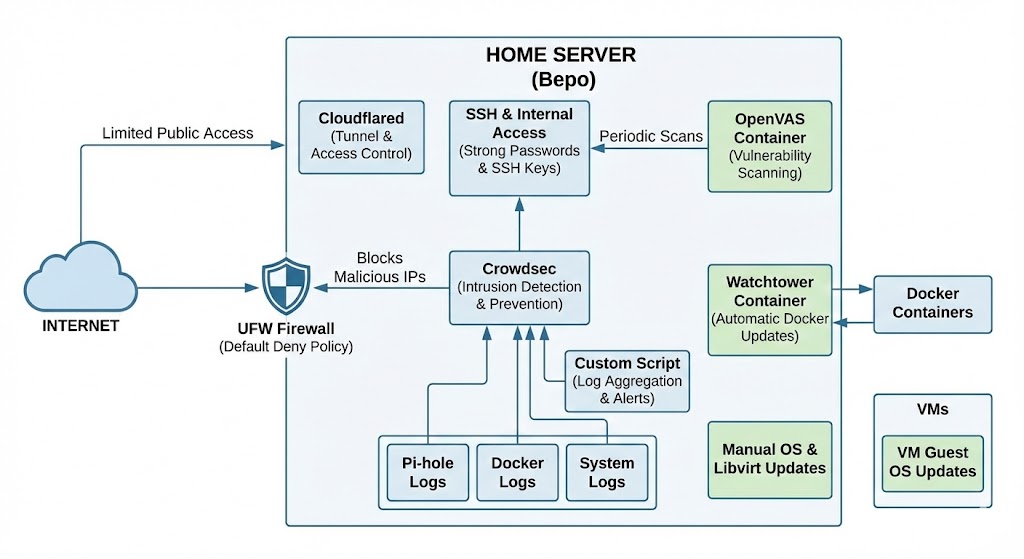
- Access Control: Public access is strictly limited via
Cloudflared. Internal access uses strong passwords and SSH keys. - Firewall: UFW (Uncomplicated Firewall) is configured with a default deny policy.
- Intrusion Detection and Prevention: Crowdsec monitors logs and automatically blocks malicious IPs.
- Log Monitoring: Automated log scanning covers
Pi-hole, Docker containers, and system logs for unusual activity. I wrote a custom script that aggregates and analyzes logs, sending alerts when domains or addresses show abnormally high DNS request counts. - Vulnerability Scanning:
OpenVAS(via anopen-vascontainer) runs periodic vulnerability scans. - Updates:
Watchtowerautomatically updates Docker containers. Regular OS updates andlibvirt/KVM updates are handled manually, and VM guest OS updates are done inside each VM.
The Application Ecosystem (via Docker)
Most of my day-to-day services run as Docker containers for efficiency and ease of management.
Cloud and Productivity
Nextcloud- My core personal cloud for files, contacts, calendars, and photos.Paperless-ngx- Ingests, OCRs, and manages scanned documents, making them searchable.Affine/Siyuan- I am exploring these for knowledge management and collaborative note-taking or whiteboarding.Cloudbeaver- Web-based UI for managing various databases.Pocketbase- Simple, self-hosted backend-as-a-service (database, auth, file storage).Glance- A self-hosted dashboard to monitor services and servers.Hoarder- Bookmarking and content curation service.
Development and CI/CD
Coder- Provides remote development environments in the browser, similar to VS Code.Jenkins- Automates building, testing, and deploying my software projects.Supabase- Open source Firebase alternative (Postgres DB, Auth, Storage, Functions).Soft-Serve- Self-hosted Git server.
File Sharing
Spacebin- Temporary text or code snippet sharing (pastebin alternative).Zipline- File sharing with URL shortening and image hosting support.
Media Management
Jellyfin- Media server for streaming movies, TV shows, and music.Sonarr- Automates downloading and managing TV series.Radarr- Automates downloading and managing movies.Prowlarr- Central indexer manager for Sonarr, Radarr, and related tools.qBittorrent(x2) - Torrent clients for downloading Linux ISOs and other content.Autobrr- Monitors IRC announce channels for releases and forwards them to download clients.Unpackerr- Automatically extracts downloaded archives.
Networking and Infrastructure
Cloudflared- Secure tunneling for public access.Gluetun- VPN client container manager.Pi-hole- Network-wide ad and tracker blocking DNS sinkhole.Portainer- Web UI for managing Docker environments (containers, images, networks, volumes).Watchtower- Automatically updates running Docker containers.Dashdot- Clean server dashboard with real-time stats.Umami- Simple, privacy-friendly web analytics.Ntfy- Push notification service (publish/subscribe) for scripts and services.
Utilities
IT-Tools- A collection of useful tools (converters, formatters, etc.) self-hosted.13ft- Alternative frontend for bypassing certain website paywalls or restrictions (use responsibly).
Challenges Faced and Lessons Learned
Building and maintaining a homelab is a continuous learning process, usually involving late nights and unexpected problems. Here are some of the bigger challenges I ran into and what they taught me.
Challenge 1: Taming the Chaos - Organization is Key
- The Problem: My early server setups had no structure. Some apps were in Docker, some were installed directly on the host, configs were scattered, and I documented almost nothing. This became a mess and made troubleshooting and updates painful.
- The Lesson and Solution: A strict, documented filesystem layout made a huge difference. Separating OS/configs (SSD) from bulk data (HDD pool) and VM images (SSD) brought clarity. Committing to Docker Compose for containerized apps enforced consistency. Now, everything is managed deliberately, which keeps the system predictable and easier to maintain.
Challenge 2: Wrestling with Aging Hardware - Compatibility Hurdles
- The Problem: Using an older enterprise box like the ThinkServer TD340 meant weird parts and potential compatibility issues. Finding a replacement CPU cooler for LGA 1366 socket with its specific mounting was incredibly annoying.
- The Lesson and Solution: Do thorough research before buying older or enterprise hardware. Check compatibility lists, forum posts, and part availability. I eventually found an obscure compatible cooler online, but proper planning could have saved a lot of time and stress.
Challenge 3: Fortifying the Gates - Initial Security Naivety
- The Problem: The first time I exposed a server to the internet, I underestimated the security risks. Lack of proper firewall rules and monitoring led to a compromise, and a crypto miner ran undetected for weeks.
- The Lesson and Solution: Security cannot be an afterthought. That incident pushed me into Linux security fundamentals:
UFW/iptables, intrusion detection (Crowdsec), regular vulnerability scanning (OpenVAS), reducing the attack surface (Cloudflared tunnels instead of direct port forwards), and sane practices like strong passwords, SSH keys, and regular updates. Proactive monitoring usingPi-holeand log analysis is now part of the routine.
Challenge 4: Untangling the Network - Complexity Creep
- The Problem: As the number of services grew (containers, VMs, internal tools, public endpoints), network management became a tangle. I originally bound Docker container ports directly on the host, which led to conflicts and headaches. On top of that, routing only specific containers through a VPN (
Gluetun) while others used LAN directly added more complexity. - The Lesson and Solution: Plan your network architecture up front. Migrating from host-bound ports to dedicated private Docker networks improved isolation and manageability. Using Docker networks alongside libvirt virtual networks for VMs, and centralizing DNS with
Pi-hole, helped bring order. Carefully mapping which services need external access versus internal-only access makes firewall rules and routing much easier to reason about, and tools likeGluetunfit more cleanly into that structure.
Challenge 5: Avoiding Lockouts - The Perils of Remote Management
- The Problem: Misconfiguring SSH, UFW, or network interfaces used to lock me out regularly. This usually meant a physical visit with a monitor and keyboard to fix things.
- The Lesson and Solution: Out-of-band management is a lifesaver. IPMI on the ThinkServer, or a PiKVM, gives you console access that is independent of the OS network stack. That makes remote troubleshooting and initial setup far safer. And regardless, double-check network or firewall changes before applying them remotely.
Challenge 6: Balancing Act - Containers vs VMs
- The Problem: With both Docker and KVM/libvirt available, choosing the right option for a new workload is not always obvious. Using a VM when a container would do wastes resources; trying to cram an awkward workload into a container can be just as bad.
- The Lesson and Solution: Understand the tradeoffs and be honest about requirements. Docker is my default for standard applications due to efficiency and simple deployment. VMs are reserved for full OS isolation, special hardware requirements, or non-Linux operating systems. Once you start running multiple VMs alongside a lot of containers, resource planning for CPU cores and RAM allocation becomes much more important.
Challenge 7: Ensuring Mount Points - MergerFS Boot Timing
- The Problem: Many containers depend on the pooled storage at
~/poolviamergerfs. Early on, I hit issues where the system would boot and Docker would start before themergerfsmount was ready. Containers failed at startup because their volumes did not exist yet. Basicfstabsettings were not always enough to guarantee the right timing. - The Lesson and Solution: FUSE mounts like
mergerfsneed explicit ordering during boot when other services depend on them. I ended up creating custom systemd unit files that define clear dependencies, so themergerfsmount completes successfully before Docker or specific application services start. That guarantees the pooled storage is ready when the containers need it.
Conclusion
Building and evolving Bepo has been a fantastic learning experience, touching everything from hardware and Linux administration to Docker, KVM/libvirt, networking, storage with MergerFS and SnapRAID, and security best practices. It has taught me a lot about managing and securing my own infrastructure and data. The current setup, balancing efficient containers with flexible VMs, has become genuinely useful day to day.
I hope this overview gives you ideas for your own homelab journey, whether you are starting from an old office PC or already running a few services. If you have any questions, feel free to reach out.